3. Assigning animals
You should have an available session set in the SmartShepherd app. See the following link to create a new session:
Once your session is created, the main screen in the app should look like this:

Go to the sessions list screen by pressing the SESSIONS button. The list of sessions will look like this:
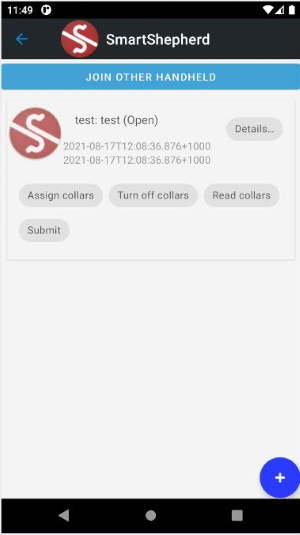
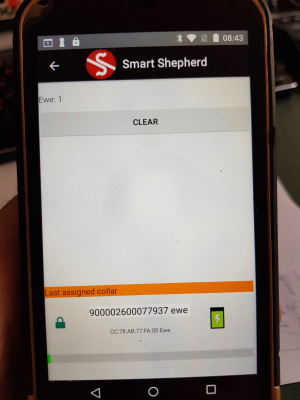
Press the "Assign collars" button on the session you are working with, the assignment search screen will look like this if no pods are nearby and turned on.
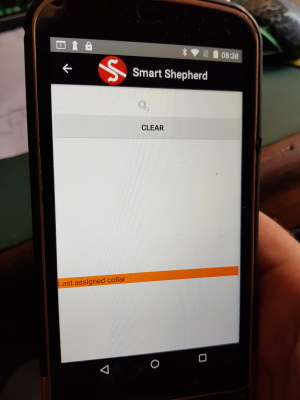
The "Clear" button forces the app to begin searching for SmartShepherd collars, you don't always need to press it but it can help when you have a device that won't appear.
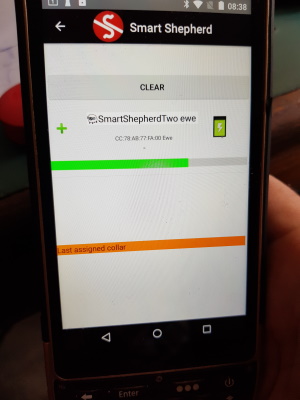
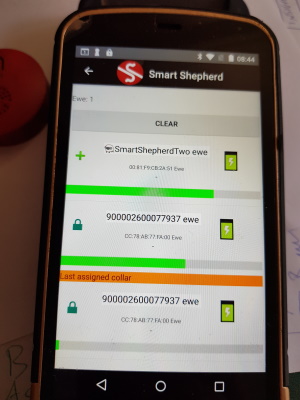
Next, we press the button to switch on a SmartShepherd pod. The pod shows up as unassigned, you can tell this is a new pod for this session as the name of the pod is "SmartShepherdTwo". We can tell this device is close by as the green bar underneath the pod details is quite long. Pods that are further away show a much shorter green bar. The green bar helps the operator to determine which pod they are trying to assign. The pod which is closest will always appear at the top of the list.
Also here you can see a green battery indicator, the pod is reporting that the internal battery is currently OK.
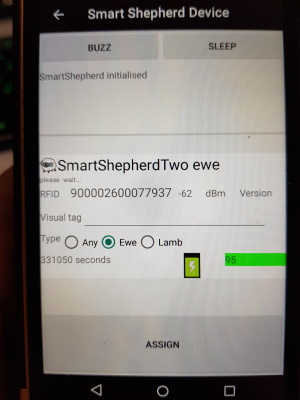
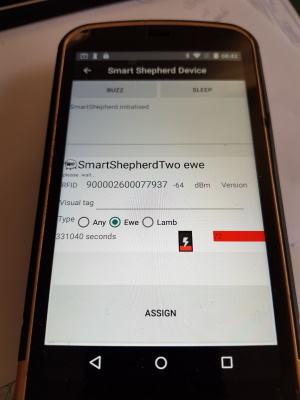
Once you press on the display for that pod above, the app will take you to the assignment screen. The assignment screen can take 5-10 seconds to connect to the pod (it will show a flashing progress indicator while that is happening). If it fails to connect, the app will come back to the search screen. If the pod connects correctly the following screen is shown.
Note in this picture I have already scanned the RFID/Eartag of the animal I am assigning this pod to. you can see the RFID field is filled out with a number. You can scan the RFID of the animal while you are waiting for the pod to connect.
You should double check that the animal details are correct (lamb or ewe) and if the animal has no RFID, type the visual ear tag number into the visual field on the screen. If the animal has no tag and you plan on tagging it when you take the collars off, put "No tag" in the visual field. The battery indicator shows the battery in this pod is OK.
If you are not sure which pod you are connected to, hit the "Buzz" button and the pod will play a jaunty tune. If you are connected to a pod you do not want to assign, you can put it to sleep remotely using the "Sleep" button. This is handy if you have a pod turned on nearby but can't work out exactly which one it is.
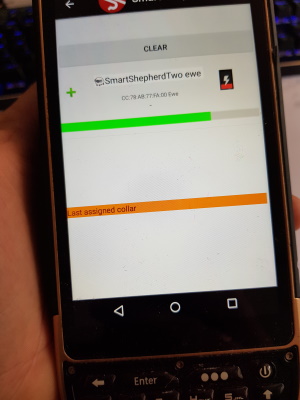
Once I have the RFID scanned, I can press the "ASSIGN" button. The screen will show progress while the pod is assigned and then return to the search screen. The last assigned pod now appears at the bottom of the search screen. If I have made a mistake (called a ewe a lamb, or got the RFID wrong) I can quickly return to that particular pod by pressing on the displayed information at the bottom.
Now I can switch on the next pod and complete the process again. There are two pods on the screen, the top one is unassigned (name is "SmartShepherdTwo"), the second one has the RFID as the display name (indicating we have assigned it to that animal). The second one is also repeated in the bottom of the screen as the last assigned pod. Note the green bar is shorter on the first pod we assigned as the pod is now further away as the animal has moved further away from the operator.
The pods will indicate their battery is in poor condition by advertising the battery strength
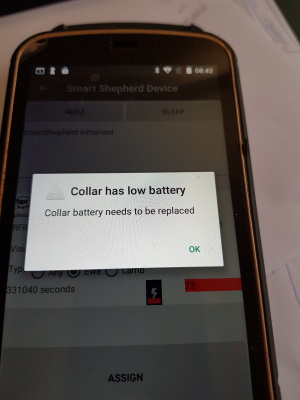
If you connect to this collar the display will reflect the low battery status of the pod.
If you attempt to assign this pod to an animal, the following warning will be generated and the system will not allow it to continue - if the battery is low the assignment process will fail.
Once you have finished assigning animals, it's time for a nice cup of tea and leave the collars on the animals for 48 hours (two nights).
After 48 hours, get your animals back in and take the collars off.
Collecting the collars after 48 hours